Back in January, when I first set up this blog, I posted a review of SlideShowPro, a great Flash component that enables easy set up very attractive, very customizable, very functional online slide shows and/or video players — without much actual knowledge of Flash. Sadly, I failed to follow up on that as far as blogging goes, but I did follow up as far as using the component in RL goes!
Below are a few examples of slide shows (most with audio) I created for my work at Emory University using SlideShowPro, plus an instance of a video player I was able to set up to show a series of four videos. In the six months I’ve been using the product, it’s really proven invaluable to me and my department, as I’ve been able to come through with multimedia presentations that pack a punch without taking a lot of time or effort. The clients are wowed and meanwhile I’ve only had to invest a couple of hours time.
On to the examples!
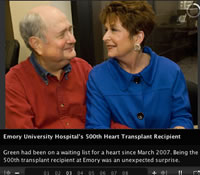
Emory University Hospital's 500th Heart Transplant Patient
Audio Slide Show:
Emory University Hospital’s 500th Heart Transplant Patient
Not counting a couple of tests I did after installing the component, this is the first slide show I produced. The event our team was documenting was a press conference by the Emory Transplant team, which was celebrating the occasion of Emory University Hospital’s 500th heart transplant. The conference was to feature the patient himself, his wife, and a couple of transplant team doctors. I was invited to tag along and “do my stuff.” Essentially all I did was plunk a digital recorder on the table during the conference and plug in the photos the University photo department delivered to me a couple of hours after the event. (I snapped some photos myself with a digital camera but of course the professional’s were far superior.) When I showed this video to the media liaisons involved and to my boss, they were amazed, as it looks like the kind of this you see on the New York Times web site, yet here I’d done it with a minimum of effort and a fast turn around. Which was exactly the point of buying SlideShowPro!
Slide Show:
Emory Med Students Celebrate Match Day 2008
This is a short piece with only half a dozen photos, but it serves the purpose of telling the story of “Match Day,” the day med students find out where they will be training as residents. Because there was no sound involved and only a handful of photos, this presentation was quick and easy to set up.
Audio Slide Show:
Joint Simulation for Emory Medical and Nursing Students
This piece was actually a of fun to set up, since I had a good bit of audio delivered to me by the media liason working on the story, plus some great photos taken by a staff photographer. Once I whittled down the audio to a 2 1/2 min. story, I selected appropriate photos and went through the same set-up process as usual. Once I was done, the liaison and the nurse interviewed were wowed by the product, as it shows off the simulation training lab in a lively, visual way while also offering personal commentary via audio.

The Global Diabetes Research Center
Audio Slide Show:
The Global Diabetes Research Center
This piece is similar to the simulation slideshow, as I was given photos and audio and asked to basically put together a story myself. I took care of the audio editing, selected photos and wrote up the captions. Once it was posted online it was featured on numerous web sites and spotlighted in electronic newsletters related to global diabetes and global health work at Emory.
How’s It Done?
To give an idea of how one of these slide shows is made, I’ll describe the process and offer up some code, using the diabetes piece as an example.
- Go into Flash, open the Components panel and drag the SlideShowPro component onto the stage.
- Select the SlideShowPro component and using the Properties panel, configure the player using the extensive list of customizable options — size, color, font, font size, image transitions, timing, etc. I also enter the name of the XML file that would be supplying data on the slide show. (More on that below).
- Size the Flash document to match the component player and export just as I would any Flash movie. Prior to export I set up Publish options so the HTML and SWF file are named as I desire and exported to a specific folder. (For my slideshows I have a root folder for slideshows called “slideshows” and a sub-folder called “gallery,” which I will mention in just a second. The HTML and SWF file go in the root “slideshows” directory.)
- Review, resize and optimize the images sent to me by University photo, then put them in a folder within the “gallery” folder. When I first started doing slide shows, I decided to set up a folder that would work as a library for all future slide shows, called “gallery” and within that, a sub-folder for this each project. For this project the images were placed here: slideshows > gallery > album1 > photos5. All the sized images were put in this folder.
- Edit audio and export as an MP3. I use Audacity, a free audio editing software system, to take care of all my audio, both for slide shows and podcasts. I place the MP3, which can be music, people talking, whatever you want, in the same folder as the image (see step 4).
- Set up the XML file. I start with an XML file I used on the previous slide show (which originated with the makers of SlideShowPro) and basically just change the details. Even if you are a clod as far as writing XML, it’s easy enough to copy the blocks and put in the right configuations.In the XML used for SlideShowPro, all you really need to do is define the folder your material will be in (folder set up in Step 4 above), give your project a name and descripiton, then set up your actual slide show. There is a data set that basically defines each picture in the show, with the title, description and file name. I go through and add in this info for each photo. When complete, the XML file is placed in the same directory as the SWF and HTML file (“slideshows”).
- Here’s what the XML file looks like:
<?xml version=”1.0″ encoding=”UTF-8″?>
<gallery>
<album lgpath=”gallery/album1/photos5/” title=”The Global Diabetes Research Center” description=”Emory has launched a Global Diabetes Research Center in collaboration with MDRF, a leading diabetes research institution in India.” audio=”gallery/album1/photos5/globaldiabetes.mp3″>
<img src=”narayan.jpg” caption=”Emory University global health professor and foremost diabetes expert K. M. Venkat Narayan, MD, MSc, MBA.”/>
<img src=”mdrf_center.jpg” caption=”The Madras Diabetes Research Foundation (MDRF) has a newly built research facility in India. The facility includes space for Emory researchers.”/>
<img src=”teamindia.jpg” caption=”Narayan on a recent visit to MDRF in India. Narayan was born and raised in India but has worked in both Scotland and the United States.” />
<img src=”teleconference.jpg” caption=”U.S. and Indian teams communicate largely virtually, with monthly meetings via teleconferencing and constant emails.” />
<img src=”familydinner.jpg” caption=”Narayan and his family share a healthy meal at home in Atlanta. Narayan is a professor of global health at Rollins School of Public Health.” />
</album>
</gallery> - Once all the files are in place (SWF, HTML, XML, image files and MP3 audio), in the right locations, I have a working slide show I can look at. In this case, I can open up the HTML file and voila! the slide player works perfectly.
- Edits are easily made. Any edits to captions, titles, etc., can be done to the XML file without doing anything to the Flash. Changes to the player can be made by going into the master Flash file (which you should always save), configuring the component and re-exporting the HTML and SWF file.
As for placing the slide show on my web site, it took some hacks to accomplish, but eventually I came up with the idea of setting up an iFrame on my site that shows the slideshows HTML file. The reason I had to do this is that the slideshow operating only within the directory structure set up in the XML file, so I can’t just copy the code and plunk it into the main directory of my site. This is what the code looks like for an iFrame:
<IFRAME NAME=”FRAME1″ SRC=”_multimedia/_slideshows/globaldiabetes.html” WIDTH=”400″ HEIGHT=”356″ FRAMEBORDER=”0″ SCROLLING=”no”></IFRAME>
The iFrame is great because not only can I use, but affiliate sites can use it, just by pasting in the same iFrame code. (For this code in context, view the source code for the page.)

Four Patient Stores
Video Player:
Four Patient Stories
For this last example, I want to show off how I used SlideShowPro to make available four videos produced by our marketing department. They are fully produced videos showing off research and clinical work at Emory by depicting specific patient stories.
Production for this player was similar to production on the regular slide shows. I configured the player in Flash, by setting up the component, created an HTML and SWF file, put the videos (in Flash video format) into a specific folder structure, and set up the XML.
This is the XML:
<?xml version=”1.0″ encoding=”UTF-8″?>
<gallery>
<album lgpath=”gallery/album1/videos1/” tnpath=”gallery/album1/videos1_tn/” title=”Four Patient Stories: Emory Health Sciences at Work”>
<img src=”depression.flv” tn=”depression.jpg” caption=”Targeting Depression: Story of a woman rescued from debilitating depression by the use of Deep Brain Stimulation (DBS), in DBS uses targeted high-frequency electrical stimulation.” />
<img src=”mammography.flv” tn=”mammography.jpg” caption=”Taking a Closer Look at Cancer: Example of how a stereo mammography screening for breast cancer, following a routine digital mammography, detected a woman’s breast cancer.” />
<img src=”heartregen.flv” tn=”heartregen.jpg” caption=”Regenerating the Heart: Manipulating stem cells may revolutionize treatment for heart attack patients like Carroll Payne, who was treated at at Emory Crawford Long Hospital.” />
<img src=”protect.flv” tn=”protect.jpg” caption=”‘PROTECT’ing the Brain: Emory University doctors are studying the use of progesterone in treating traumatic brain injuries, like the one suffered by Marc Baskett, profiled in this video.” />
</album>
</gallery>
There are a few difference when doing video, however. For one thing, I wanted the user be able to navigate between videos, either by clicking on thumbnails at the bottom of the screen or by going to a “Gallery” page. To do this I set up thumbnails (the size and locations of which had to be specified in the Flash Component) and put the thumbnails in another folder. Then I had to make sure the thumbnails and gallery were set to display (again, needs to be specified in the Flash Component). But that was pretty much it.
One great thing about this particular player is that later on, when I was asked to set up player for individual videos within this player, all I had to do is set up a new Flash player pointing to a different XML file, but I could use the same video file. So it really only takes a few minutes to do. Here’s an example of one of the stand-along player I set up for these patient story videos: Targeting Depression.
I hope that this gives the reader of a good idea of just how easy it is to take this inexpensive tool and run with it, creating a nice-looking, highly functional multimedia presentations without a lot of effort. I give SlideShowPro two thumbs up!
 SlideShowPro for Flash